
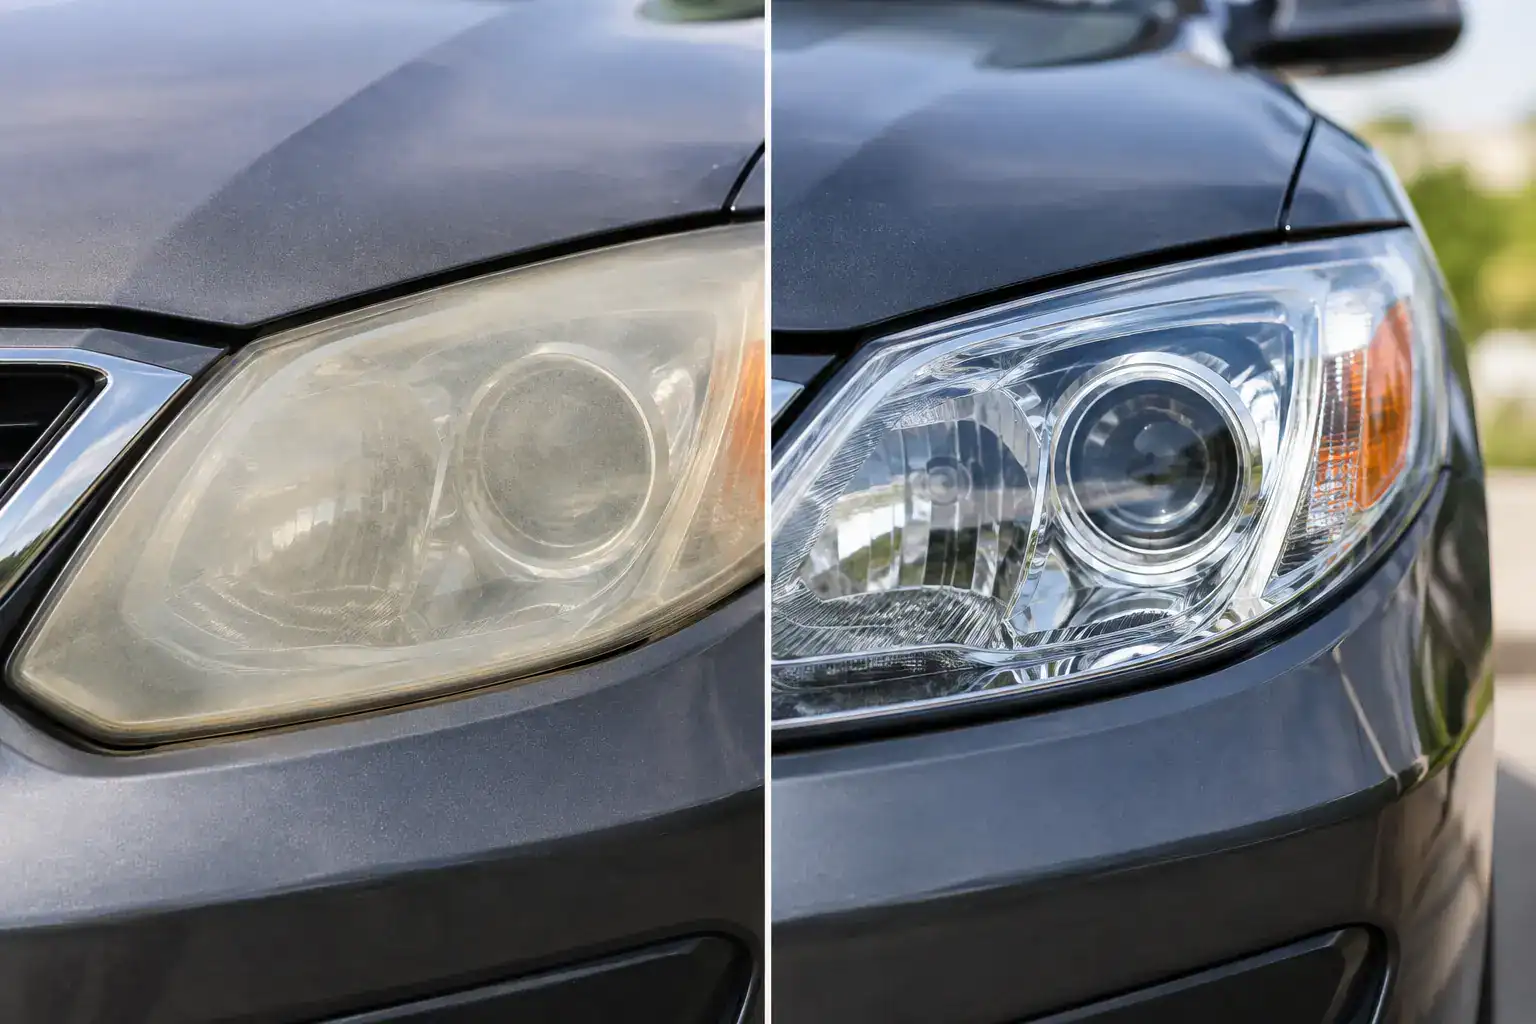
A true headlight restoration before and after is more than a dramatic photo. The visible change matters, especially when yellow, hazy lenses make an otherwise well-kept vehicle look older than it is. But the result drivers feel most is clearer light output on dark streets, freeway ramps, and late-night commutes across Los Angeles.
Cloudy headlights are usually not a bulb problem. Most modern headlight lenses are made from polycarbonate plastic, which is durable but vulnerable to ultraviolet exposure, road grit, car-wash abrasion, and years of heat. The original factory UV layer gradually breaks down. What starts as a light haze can become a yellow, chalky, scratched surface that scatters the beam before it reaches the road.
The right restoration removes that damaged outer material in a controlled way, refines the lens to optical clarity, and protects it again. A quick buff may look good for a short time. Proper correction is what gives the before-and-after result a chance to last.
What Changes in Headlight Restoration Before and After
Before restoration, the lens may look yellow, milky, dull, or rough to the touch. In severe cases, the beam pattern becomes noticeably weaker because the damaged surface diffuses light in every direction. Drivers often compensate by turning on high beams more often, replacing bulbs that are still functional, or simply accepting poor visibility.
After professional restoration, the lens should look clear, evenly finished, and free of the heavy oxidation that was blocking and scattering light. The housings remain original to the vehicle, which is often a better outcome than replacing an OEM assembly with an uncertain aftermarket alternative.
There are limits, and a responsible service should explain them before work begins. Surface oxidation, shallow scratches, and failed exterior coating can usually be corrected very well. Moisture inside the housing, cracked lenses, damaged reflectors, burned projector bowls, and deep impact damage are different issues. Restoring the outside lens will not repair an internal housing failure.
Clarity is not the same as a temporary shine
A polished headlight can look clear immediately after a compound is applied. That does not necessarily mean the oxidation has been removed. If degraded plastic remains beneath the polish, or if no UV protection is applied afterward, the lens can haze over again quickly under California sun.
That is why the best before-and-after photos show more than gloss. Look for uniform clarity across the whole lens, including corners and edges. The finish should not have cloudy patches, sanding marks, swirl marks, or a greasy-looking residue that disappears after the first wash.
Why Los Angeles Headlights Oxidize So Fast
Southern California offers plenty of reasons to keep a car clean, but the same conditions can be hard on exterior plastic. Strong UV exposure is the primary cause of lens deterioration. Heat, freeway debris, dry dust, parking outdoors, and frequent washing all add wear over time.
A vehicle parked outside in Burbank, Pasadena, Glendale, the San Fernando Valley, or along the Westside may develop haze sooner than a garage-kept vehicle. The timeline also depends on the lens material, vehicle age, prior repairs, and whether someone previously used a DIY kit or an abrasive shortcut without a durable protective coating.
This is not a reason to wait until headlights become fully yellow. Early restoration usually requires less material removal and leaves more of the original lens intact. It also prevents drivers from getting used to reduced visibility so gradually that they no longer notice it.
The Process Behind a Durable Result
Professional restoration is a surface-correction service, not just cosmetic polishing. At Sako’s Mobile Headlight Restoration, the process is designed to correct the failed layer while protecting the surrounding paint, trim, and original headlight housing.
Inspection, cleaning, and careful masking
Every lens should be inspected first. The technician checks the degree of oxidation, scratches, old coating residue, rock chips, and signs of internal damage. This matters because the condition determines how much correction is appropriate and whether restoration is the right recommendation.
The lens is cleaned, then the paint and trim around it are carefully masked. Proper masking is not an optional detail. Sanding and machine polishing near a bumper, fender, grille, or painted edge require control. The goal is to improve the lens without creating a new problem around it.
Progressive wet sanding removes the damaged layer
The cloudy appearance lives in the damaged outer plastic. To remove it, the lens is wet-sanded progressively, beginning as needed around 400 grit and refining through 4000 grit. Each step removes the scratches from the prior step while leveling oxidation and defects.
This stage can look alarming to someone watching for the first time because the lens becomes uniformly matte. That is expected. A hazy lens is not made clear by skipping straight to polish. The sanding stages create a level, correctable surface so the final clarity is even rather than temporary.
The exact sanding approach depends on the lens. Heavy oxidation may need more correction, while a lightly hazed lens should not be treated as aggressively as a severely damaged one. Removing only what is necessary helps preserve the original component.
Two-stage machine polishing restores optical clarity
After the sanding marks are refined, two-stage machine polishing brings back transparency. The first polish removes the fine haze left from sanding. The finishing stage sharpens clarity and improves the evenness of the lens surface.
This is where a professional result separates itself from a rushed job. The technician works the full usable surface, manages heat, and checks the lens from different angles. A clear center with dull edges is not a completed restoration.
Alcohol preparation and ceramic UV coating
Before protection is applied, the lens is prepared with alcohol to remove polishing oils and residue. This allows the protective coating to bond to a clean surface rather than sitting on top of contaminants.
A premium ceramic UV coating is then applied to help shield the corrected plastic from the same sunlight that caused the original oxidation. This final step is essential in Southern California. Without protection, clear polycarbonate is exposed again from day one.
No coating makes a headlight immune to age, impacts, or prolonged UV exposure. It does, however, provide a far more sensible defense than leaving a freshly sanded lens bare or relying on a quick polish alone.
Restoration Versus Replacement: When Each Makes Sense
Replacing headlights can be expensive, especially on vehicles with adaptive lighting, LED modules, HID systems, or assemblies that require programming and calibration. There is also the question of fit, lens quality, and whether an aftermarket assembly will match the original housing.
For an OEM housing with exterior haze and no major structural damage, restoration is often the practical choice. It improves appearance and usable light while preserving the factory assembly. Starting prices from $99 make restoration substantially less costly than many replacement options, though a precise quote depends on lens condition, materials, past repair attempts, and mobile travel distance.
Replacement makes more sense when the lens is cracked, the housing leaks, mounting tabs are broken, reflectors are failing, or damage is internal. A clear explanation of that distinction protects the customer from paying for work that cannot solve the actual issue.
How to Keep Restored Headlights Clearer for Longer
Aftercare is straightforward, but it affects how long the result stays looking its best. Avoid harsh cleaners, abrasive pads, and aggressive scrubbing on the lenses. Wash them with normal automotive soap and a soft microfiber towel, just as you would painted surfaces.
When possible, park under cover or use shade during long periods of sun exposure. This will not eliminate UV wear, but it reduces the constant heat and sunlight that degrade exterior materials. If the vehicle spends every day outdoors, periodic inspection is sensible.
A workmanship warranty should also be specific. Sako’s provides a one-year workmanship warranty for the restoration service, while normal new damage, accidents, rock chips, cracked housings, internal defects, and neglect fall outside what surface restoration can control. Clear warranty boundaries are a sign that the service is being presented honestly.
Questions Drivers Often Ask
Will restored headlights look brand new?
Many lenses can look dramatically clearer, but the final result depends on their starting condition. Deep chips, stress cracking, internal discoloration, and prior damage may remain visible even after the exterior oxidation is corrected. The objective is meaningful clarity and protection, not a promise that every aged lens will become flawless.
Can I use a store-bought restoration kit instead?
A DIY kit can improve mild haze, particularly if the owner is patient and follows every step. The trade-off is consistency and protection. Uneven sanding, missed edges, paint contact, insufficient refinement, and weak or improperly applied sealants are common reasons DIY results fade quickly.
How long does mobile service take?
Timing depends on the severity of oxidation and the vehicle’s lens design. A light correction takes less time than heavily oxidized lenses requiring multiple sanding stages. Mobile service removes the waiting-room problem: the work can be completed at your home or workplace while you keep your day moving.
Clear headlights do not need to be a mystery or an automatic replacement expense. If your lenses are yellow, hazy, or dull, addressing the surface damage before it worsens can preserve the original housings, improve nighttime confidence, and make the rest of the vehicle look properly cared for.
Leave a Reply